Support Center.
Get Started or Become a Pro. Browse our support articles to learn how to get the best out of PeopleGoal.
Permissions & Visibility
Permissions are a crucial part of your PeopleGoal platform. Setting up permissions gives you control over who can view, edit and interact with the workspaces, apps and items in your PeopleGoal account. As a workspace or app owner you have the ability to design flexible apps that are relevant for the participants, and using permissions you can easily build your PeopleGoal account as an all-in-one HR portal.
Visibility settings can then be designed on the app template to give further flexibility for state participants, and for the app template itself. We'll explain these concepts below, and show you how to set permissions and visibility across your account.
You do not need to be an Account Owner to have Owner access on workspaces or apps! This is very important and gives a lot of flexibility in your processes. It also gives scope for senior leaders outside of HR to create and run their own initiatives in your PeopleGoal account, without needing access to the Account menu.
Permission types explained
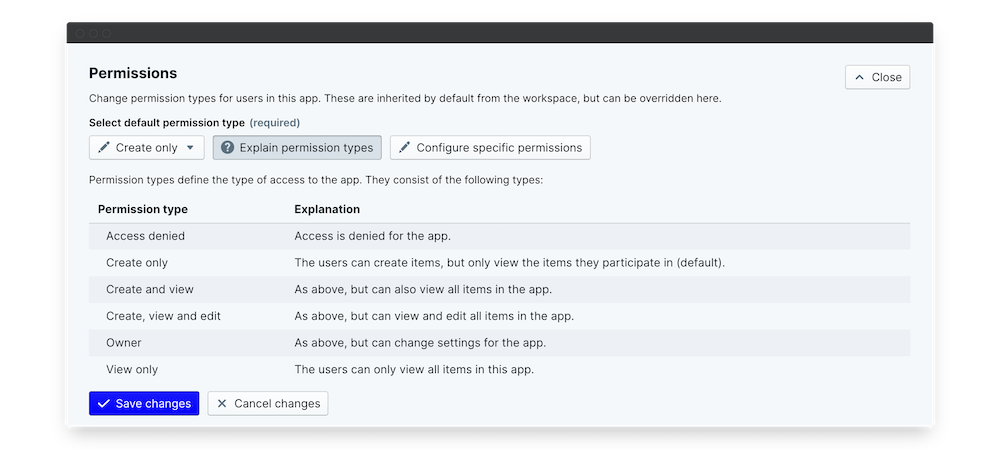
Within workspaces and apps there are six types of permissions that control their visibility:
- Access denied: the workspace/app is not accesssible at all.
- Create only: users can create items for themselves but can only view the items they participate in. They cannot view items in which they're not a participant.
- Create and view: users can create items for themselves and view all other items in the workspace/app.
- Create, view and edit: users can create items for themselves, view all other items in the workspace/app and edit other users' items. They cannot change the workspace/app settings or the app template.
- Owner: has full access to all data in the workspace/app and the ability to change workspace/app settings.
- View only: can only view all the items in the workspace/app, but cannot create or edit any items or change workspace/app settings.
Using these six permission types, you can control:
- Access to workspaces
- Access to apps (inherited from the workspace, but can be overridden)
Set Workspace Permissions
A workspace owner is the only one who can change workspace permissions. The default owner is always the person who created the workspace (not necessarily the account owner).
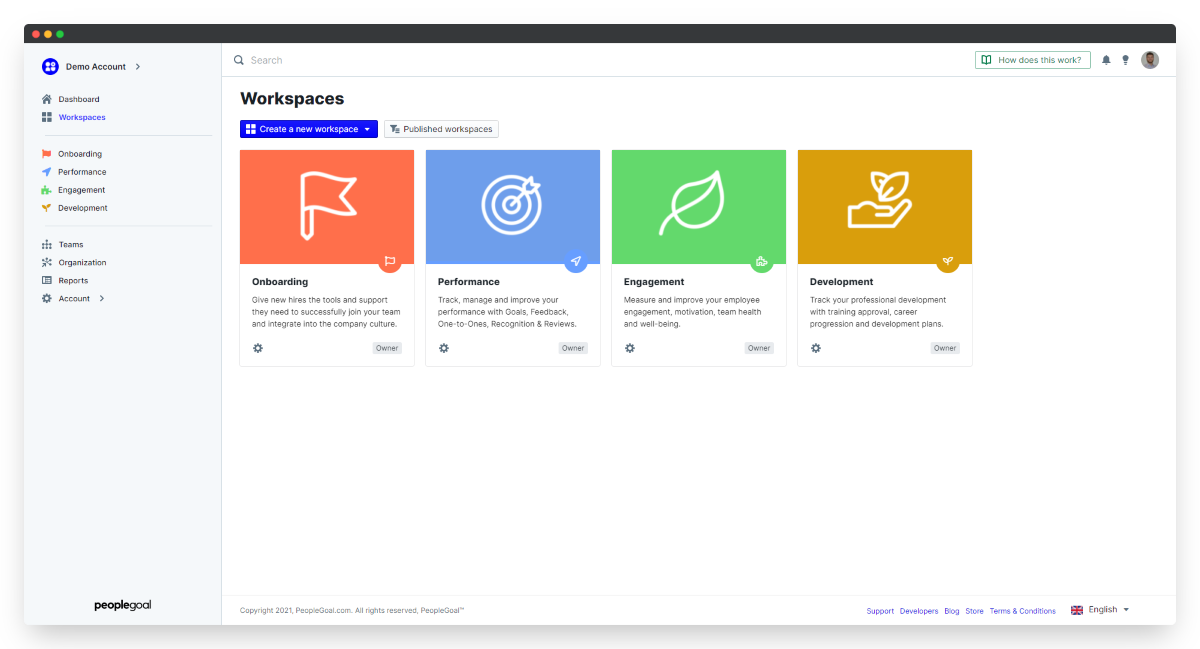
- Select Workspaces in the navbar to view all of your workspaces.
- You'll already see a gray permissions flag in the bottom right corner of each workspace tile that shows you the access you have to this workspace.
- Click the workspace you want to open up, then select the Settings tab and expand the Permissions setting.

Default permissions
The default permission type is the one that applies to every user in the account.
- Click the permission type drop-down to change this, then click Save changes.

Typically the default permission type would be "Create only", so that users can access your workspace for themselves but not edit or view any of the other items it contains. But you can also set "Access denied" to create restricted workspaces, and then configure specific permissions to give access to select users only.
Specific permissions
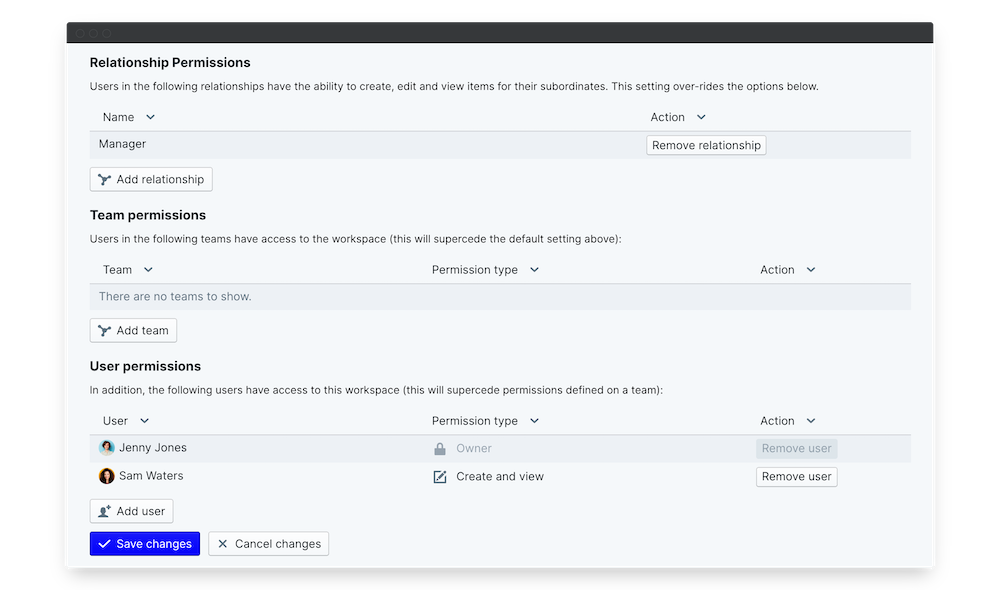
Now you can grant permissions for exceptional cases. Click Configure specific permissions.
Specific permissions can be set for teams of users or for individuals. You'll already see yourself listed in the User permissions area as the workspace owner.
- Click Add team to grant different permissions for every user in a team.
- Then click Add user to grant further permissions for an individual.
- Even if that individual is a member of the team you selected above, their individual user permission level will override this.

Relationship permissions
There are often times when you want to grant access to create, view and edit items for a specific relationship only. For example, you want your Managers to be able to create, view and edit goals for their direct reports only.
- To do this, in the Relationship permissions area click to add the relationship you want to give this special access.
- You can choose any of the relationship types you have created.
How does this work in practice?
As an example, say we're editing the Performance Management workspace. Your HR team will need to be able to view all data in the workspace but we want to limit the ability for other team members to change the workspace settings. Additionally, your CEO wants to be able to see what's going on in the full organization but doesn't need to create any items for other users.
Our default permission type would be "Create only". Our specific team permissions would be "Create, view and edit" for just the HR team. Our specific user permissions would be "View only" for the CEO, and "Owner" for yourself. Even if you're a member of the HR team, it's your user permission that takes precedence and you have "Owner" access rather than just "Create, view and edit".
Set App Permissions
App permissions are inherited from the workspace the app belongs to.
When you create a new app all the permissions are exactly the same as its parent workspace. So if you've configured specific permissions for your Performance Management workspace, any app you create in that workspace will also have those same permissions.
However, you can change permissions on the app level to allow different access to your app.
Note that if you install an app from the App Store, the default permission will be Owner. Remember to update this before you launch your app to all users!
An example might be that the Talent Development workspace has "Create only" permissions by default, for users to create development plans with their managers and access training apps. Within this workspace you create a Succession Planning app to which you can restrict access for everyone except the HR team.
- To set app permissions, open up the app you want to edit and click the Settings tab.
- Expand the Permissions setting and configure your default and specific permissions the same way you did for workspaces.
- Click Save changes to update.
At the very top of the screen next to your app title you'll see a blue permissions flag, showing you the permission level you have for this app.

App Visibility
We'll explain this in more detail in the Apps article, but it's worth going over briefly now.
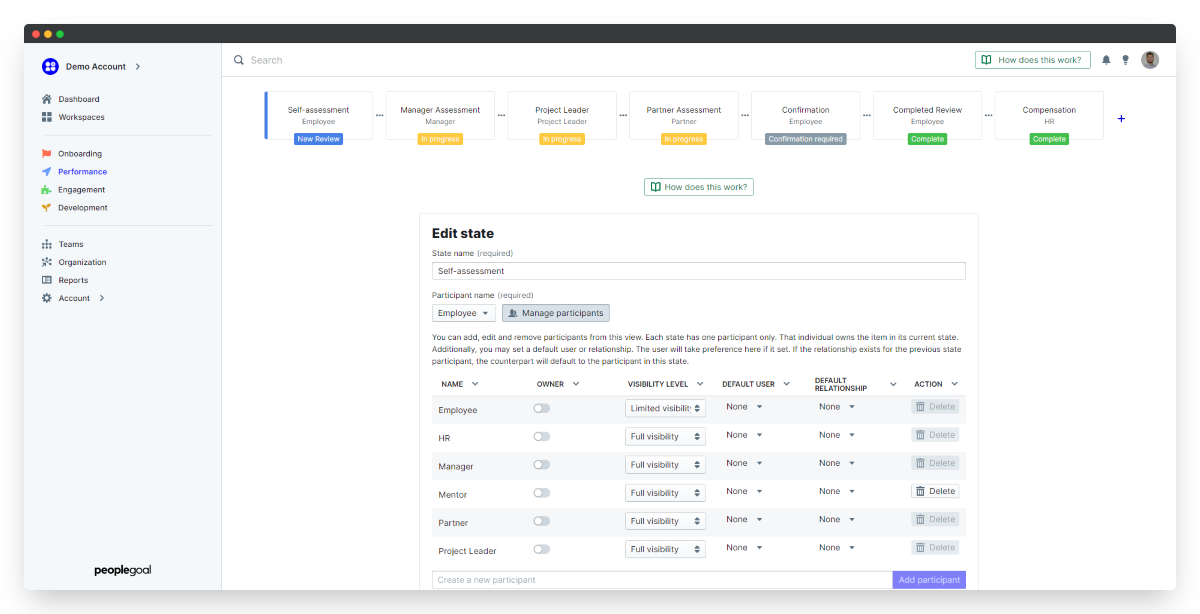
Apps are workflows that are built as a template that contains sections and elements. Apps move through multiple states, and each state has one participant. Items are an instance of an app created by a user.
Participants are given either limited visibility or full visibility to the item they're participting in. Limited visibility means they can only see the item in the state they own, and full visibility means they can view the item in any state of the workflow.
Sections and elements can be hidden in a certain state, or can be marked read only in a state. This means you can hide whole areas of the workflow from a specific participant, or make those areas read-only to that participant.

How does this work in practice?
To illustrate, let's look at the permissions and visibility for a simple Reviews app.
Our review goes through four states: 1. Employee self-assessment 2. Manager assessment 3. HR approval 4. Final confirmation
And we've got three participants: 1. Employee 2. Manager 3. HR reviewer
The default app permissions are "Create only" - employees can create a review for themselves but can't see anyone else's review. Managers can participate in the employee's review but can't see any review in which they're not a participant.
The employee has limited visibility - they can only view the review when they are the state participant. So they can see their self assessment as they draft it, but once it's sent to the manager it becomes inaccessible until it's sent back to the employee for their final signature.
The manager has full visibility - they can view (but not edit) the review when it's in the employee self assessment state and when it's been submitted to HR for approval, even though they aren't the participant in either of these states.
In state 1 the employee self-asssessment section is visible and editable to the employee. The employee is filling out their responses.
In state 2 the employee self-assessment section is read-only to the manager, and the manager assessment elements are editable. The manager is viewing the employee's responses and entering their manager assessment responses.
In state 3 the entire review form is read-only to the HR reviewer, and the HR confirmation section is editable. The HR reviewer can read all the review responses but can only add their comments to the HR confirmation section.
In state 4 the entire review form is read-only to the employee, and the HR confirmation is hidden. The employee can view (but not edit) all of the review responses, and the HR section is kept confidential from the employee.
Quick summary of visibility
So you can see that permissions and visibility give you an extremely flexible level of access control throughout your account. If you're getting stuck, remember that the order in which permissions are given goes:
- Workspace permissions.
- App permissions (override any workspace permissions).
- Participant visibility (whether they can see an item in any state or just the state they own).
- Section visibility (whether the app section is hidden, read-only or editable to this participant).
- Element visibility (whether the individual fields within a section are hidden, read-only or editable to this participant).
PeopleGoal Support Team
Account Management & Implementation Specialists